Showing posts with label fruit. Show all posts

Tuesday, June 30, 2009

Crust Convert

I have never been what you would call a "crust person." Though the delicious berry and fruit pies of summer sit near the very top of my favorite desserts list - second only to an ooey gooey chocolate cake, of course - I've never been able to get excited over the requisite bland casing holding my slice together. Frankly, it's never tasted like much to me, and - as I've always told myself - if I skip all that fat and flour, pie is downright healthy!

Enter Julia Child.

If you've been reading this blog for awhile, you know that Baking with Julia has been my go-to baking bible. And lo and behold, when I returned home from the 14th and U Farmers Market with a fridgeful of glossy cherries and an intense desire for a big slice of freshly made cherry pie, a quick flip through her pages revealed what Ms. Child declares as "the classic dough that earns blue ribbons at country fairs and stars at esteemed pastry shops." Skeptic though I was, I gave it a try. And you know what? It was buttery and flaky and tender and awesome. Count me among the Crust Converts. (And so much for my healthy pies).

This recipe makes enough dough for four 9- to 10-inch tarts or open faced pieces, or 2 double crusted pies. It's super easy, too - just remember to keep everything cold and not to overmix. It also freezes beautifully for up to a month, so you might as well make the whole batch - after all, there are a lot of summer fruits to look forward to.

Perfect Pie Crust
from Baking with Julia
5 1/4 cups all-purpose flour
1 tbsp kosher salt
1 1/2 sticks (3/4 cup) cold unsalted butter, cut into small pieces
1 3/4 cups solid vegetable shortening, chilled (I used butter-flavored)
1 cup ice water

Mix the flour and salt together in a large bowl. Add the butter, and using a pastry blender or your fingers, cut the butter into the flour until the mixture looks like coarse crumbs (this will take a little while). Break up the shortening and add it in bits to the bowl, working it in with the pastry blender or your fingers until small clumps and curds form. Switch to a wooden spoon and add the ice water, stirring to incorporate it. Turn the dough onto a work surface and fold it over itself a few times, just til it all holds together. Don't overwork it!

Divide dough into 4 equal pieces, shape into flat disks, and wrap tightly in plastic wrap and chill in the refrigerator for at least 2 hours, or as long as 5 days. The dough can also be frozen for up to one month - just thaw completely in the fridge before using.

And, because I can't show you this delcious pie without giving you the recipe...

Best Ever Deep Dish Cherry Pie
2 dough disks, recipe above
1 cup sugar
3 tbsp cornstarch
1/2 tsp salt
1 quart whole pitted sour cherries
1 quart whole pitted sweet cherries
1 tbsp lemon juice
1 tsp vanilla extract
2 tbsp unsalted butter, cut into small cubes
1 tbsp milk

Position rack in lower third of oven and preheat to 425. Whisk sugar, cornstarch, and salt in medium bowl to blend. Stir in cherries, lemon juice, and vanilla; set aside.

Roll out one dough disk on a floured surface to a 12-inch round, lifting and turning frequently so it doesn't stick. Transfer to a 9-inch deep dish pie dish by wrapping it around your rolling pin, and gently work it into the pan - don't pull or stretch it. Trim dough overhang to 1/2 inch. Chill crust while you finish preparing the pie.

Whisk sugar, cornstarch and salt in a large bowl. Stir in cherries, lemon juice and vanilla; set aside.

Roll out the second disk to a 12-inch round. Using a pastry wheel with a fluted edge, cut ten strips from the dough round.

Transfer the cherry filling to the dough-lined dish, mounding slightly in center. Dot with the butter, then arrange the dough strips on top of the filling, forming a lattice. Trim the dough strip overhang to 1/2 inch and fold the bottom crust up over ends; crimp the edges to seal. Brush the lattice crust (not the edges) with the milk and sprinkle lattice with a tablespoon of sugar.

Place pie on rimmed baking sheet and bake 15 minutes. Reduce oven temperature to 375 and bake until the filling is bubbling and the crust is golden brown, about an hour longer. (During baking, cover the edges with a foil collar if browning too quickly). Transfer the pie to a rack and cool completely. Cut into wedges and serve with vanilla ice cream.

Monday, June 1, 2009

A Trifling Dessert

Ah, late spring/early summer. It's one of my very favorite times of year. And for me, one of the happiest places to be at this exact time of year is at a farmer's market. Walking through the throngs of smiling Sunday morning people, my thought process goes something like this - "Strawberries! And asparagus! And peas! And strawberries! And green stuff!...And strawberries!"

Yes, with row after row of those insanely sweet smelling and juicy strawberries on display right now, I would be remiss if I didn't offer at least one sigh-inducing dessert showcasing these little beauties. So, other than suggesting you eat them right out of the carton in the middle of the market, I give you Strawberry Trifle Cake, a riff on a delicious trifle my parents like to serve. You can make it quick with box mixes and ready-made pudding, or you can go old school and make each part from scratch. Either way, it's one of the best desserts I've ever had. (Seriously, I'm thinking about making another one right now). So enjoy, and please share any favorite strawberry dishes you have with me - I will try to keep my hands off my newest batch long enough to try yours out!

Strawberry Trifle Cake
1 box yellow cake mix
1 pint fresh strawberries, hulled and sliced, divided
2 tbsp sugar
2 8-oz packages cream cheese
4 3-oz cups vanilla pudding
1/2 cup powdered sugar
1/2 tbsp vanilla extract

Pour cake batter into two greased 8-inch cake pans. Cook according to package instructions. Turn out onto wire racks and cool completely. Meanwhile, place half the sliced strawberries in a bowl. Sprinkle with sugar, stir to combine and place in fridge while cake is cooling.

For the icing: In a stand mixer or large bowl with a handheld mixer, beat together the cream cheese and pudding until smooth. Gradually add the powdered sugar, being sure to break up any lumps. Add the vanilla extract; stir to combine.

Place one cake round on a cake plate. Smooth a cupful of icing over the top. Cover with a layer of the unsweetened sliced strawberries. Top with second cake round and finishing icing the top and sides of cake. Let chill for several hours.

To serve: Mash up the chilled sweetened strawberries with the back of a fork until a thick sauce forms. Slice the cake and serve with the strawberries.

Thursday, April 2, 2009

Sweet and Tart

Do you like going wine tasting in Virginia? I sure do. And do you find yourself in the same predicament as me, in which you get so caught up in the fun of wine tasting and the atmosphere of wine tasting and the, well, wine of wine tasing that you find yourself back at home that evening with a bunch of wine you wouldn't normally have bought and you don't really know what to do with? Good, I'm glad it's not just me.

This particular predicament is the cataylst behind this posting. I have gone to Linden Vineyards more times than I can count. I love the place, the people, and, usually, the wines. Linden makes a wonderful dessert wine, the Late Harvest Vidal, and while I am not really a dessert wine person - they usually taste like syrup to me - this one is extremely good (Linden says it has "dense, opulent and warming flavors of sweet nectar and persimmons"...ok). What's more, in the past they've served a gorgonzola tart alongside the wine to showcase how different it can taste when eaten with a more savory, cheese-focused dessert. It was a bit of a revelation to me, realizing how un-syrupy and complex a dessert wine can be when paired with the right foods. So of course I had to buy a bottle. And of course it's sat on my counter for a year, because when am I going to make a gorgonzola tart to un-syrupify it?

Well, I finally got motivated after another trip to Linden several weekends ago and tried my hand at a cheese dessert to go with my dear old Vidal. I added a bit of fig jam for sweetness, a bit of ricotta to mellow the flavor, a bit of pecans for crunch, and presto! A delicious pairing...though I don't think I'm going to wait for another dessert wine to collect dust on my shelf to make this tart again.

Gorgonzola Fig Tart

For the crust:
2 1/2 cups all purpose flour
1 tsp salt
1 tsp sugar
1 cup very cold unsalted butter, cut into 1 tbsp pieces
1/4 - 1/2 cup cold water

For the filling:
1/2 cup gorgonzola
1 1/2 cups ricotta cheese
2 large egg yolks
Dash of pure vanilla extract
1/2 cup chopped pecans
1/2 cup dried fig jam
Preheat oven to 350 degrees.

In a food processor, add the flour, salt and sugar and pulse a few times to mix. Add in the butter and pulse a few times until the mixture looks grainy. Slowly, while pulsing, add the water until the mixture becomes dough when pressed between your fingers. Press the dough into a buttered tart pan and bake for 15 minutes, until lightly golden. Remove and let cool.

Meanwhile, in a medium bowl, whisk together the cheeses, egg yolks, and vanilla. Fold in the nuts. Set aside. Spread half the dried fig jam over the bottom of the cooled pie crust, then pour in the cheese mixture, smoothing the top. Drop dollops of the remaining jam in several concentric circles over the top of the filling. Then, using a knife or toothpick, drag through each circle in alternating directions in order to form a pretty patten (see above). Bake in the middle rack of the oven for about 25 minutes, or until the filling remains firm when jiggled. Let cool, slice and serve.

Friday, January 30, 2009

The Locavore's Dilemma

I’m all for trying to be a locavore – you know, shopping at my neighborhood farmers markets, not eating strawberries in January, that sort of thing. If you asked me why, it’s probably equal parts feeling it’s the ‘responsible consumer’ thing to do, and also believing that local, season-specific food just plain tastes better.

While I subscribe to this food philosophy, my husband doesn’t really care so much where or when he gets his food, so long as it tastes good – although, seeing as I do 98% of the cooking in our house, he kind of ends up on the locavore bandwagon by default. So you can imagine my dilemma when my dear husband arrives home from the grocery store with…bananas. Bananas! The forbidden fruit, that abhorred, anti-poster child of the local food eatin’, Barbara Kingsolver lovin’ tribe. (It has something to do with each bunch requiring a small country’s annual supply of gas to reach us Americans, I think).

So what to do? I can either: 1) go all preachy on his ass and tell him such evil is not welcome in MY kitchen, or 2) accept that we may have different views when it comes to our food choices – and that's ok. Seeing as we’re only about 4 months into our union, I figured I’d hold off on the banana diatribe and save the preaching for a more worthy cause – like who should take the trash out (him), or the merits of still watching Grey’s Anatomy (it's getting good again, really!) And, if I'm being honest, that forbidden fruit does make a wicked batch of muffins. I mean, the real sin is letting a perfectly overripe banana go to waste after it came all that way. I think even Barbara would agree with that.

Chocolate Chip Banana Muffins
1 ½ cups flour
1/3 cup sugar
1 ½ tsp baking powder
¼ tsp baking soda
¼ tsp salt
½ cup (1 stick) unsalted butter
1 cup sour cream
1 large egg
1 tsp vanilla extract
2 very overripe bananas, mashed
2 ounces bittersweet chocolate, cut into small pieces (or ¾ cup chocolate chips)
Turbinado sugar, optional

Preheat oven to 400 degrees and line 12 (1/3 cup) muffins cups with paper liners. Sift the flour, sugar, baking powder, baking soda, and salt into a large bowl. In a medium bowl, melt the butter. Stir in the sour cream, egg and vanilla, then fold in the mashed bananas and the chocolate. Mix the wet ingredients into the dry until just mixed – it will be very thick. Divide the batter into each muffin tin (a small ice cream scoop works very well for this). If you like that sugary crunch on top of your muffins, sprinkle each with a tablespoon or two of the raw sugar. Bake in the middle of the oven until golden and a tester comes out clean, about 20 minutes.

Sunday, December 28, 2008

Love Dish: Citrus-Rosemary Roasted Chicken

Welcome back, everyone! I hope you all had a wonderful, relaxing, food-filled vacation. I spent the majority of my holiday sitting around my parents' kitchen making some of our favorite family recipes (and taking meticulous notes), and I'm excited to share them all with you soon. In the meantime, though, here's a simple dish that I made last night. After all the feasting of Christmas was behind us, we wanted a dinner that required very little effort. A few chickens in the freezer, some oranges in the fridge, and the hardy rosemary bush in the backyard were all we needed.

Citrus-Rosemary Roasted Chicken
2 5-lb roasting chickens
2 oranges
6 rosemary sprigs
1/4 cup olive oil
1 tsp kosher salt
1/2 tsp coarsely ground black pepper

Preheat the oven to 450 degree.

Remove the giblets from the chickens and either save for another use or discard. Wash the chickens inside and out and pat dry. Sprinkle the cavities with salt and pepper. Cut each orange in half; squeeze the juice of both halves over the skin of one chicken and stuff the cavity with the rinds. Repeat with the other chicken. Place one rosemary sprig in each cavity. Pull the leaves off the remaining sprigs and chop finely. In a small bowl, combine the olive oil, rosemary, and salt and pepper. Spread evenly over both chickens, rubbing with your hands to coat evenly.

Place both chickens in a large roaster and place in oven. Immediately lower the heat to 350 and roast for 1 1/2 hours, or until a meat thermometer placed in the thickest part of one of the chicken's thighs reaches 175. Remove from oven; tent with foil and let rest for ten minutes. Carve and serve.

Thursday, December 18, 2008

Love Dish: Chocolate Chip Cranberry Cookie Bars

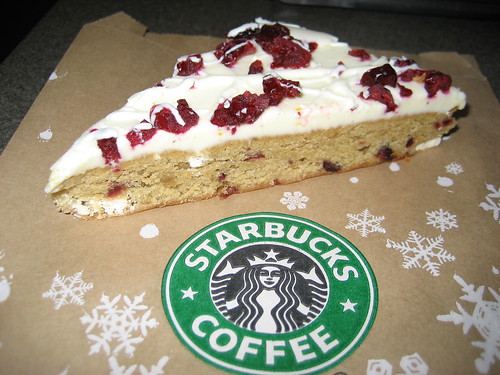
Hello, my name is Lisa and I'm a recovering Starbucks addict. I'm proud to say that the siren call of the cafe mocha rarely has even a weekly pull for me, much less the daily one it used to command. However, come wintertime, sneaking away from work for a warm shot of comfort and caffeine is ever present in the back of my mind. And, thanks to a delicious treat this fancy shmancy coffee chain features each holiday season, it's even harder for me to resist right now.

The cranberry bliss bar beckons to me from behind the glass display. I don't even notice its espresso and toffee crunch cousins sitting nearby who used to tempt me so. A blondie brownie base, topped with a snowy drift of creamy icing and a festive sprinkling of tart cranberries...it really is just that - bliss in a little brown bag.
Come January, it's always so sad to see them go; as if the end of the holidays isn't depressing enough. So, I figured, why not recreate this divine concoction at home so I can enjoy them anytime I want? (And, of course, what sweet creation couldn't be improved upon by adding a little chocolate?) The result: definitely blissful, and the perfect holiday treat - no $4 coffee required.

Chocolate Chip Cranberry Cookie Bars
For the cookie base:
2 1/4 cups all purpose flour
1 tsp salt
1 tsp baking soda
3/4 cup sugar
3/4 cup brown sugar
2 sticks unsalted butter
1 tbsp pure vanilla extract
2 eggs
6 oz (half a bag) of semi-sweet chocolate chips
For the icing:
1 stick unsalted butter, softened
1 8-oz package cream cheese, softened
1 tsp pure vanilla extract
1 cup powdered sugar
3/4 cup dried cranberries
Preheat the oven to 350 degrees.

In a medium bowl, sift together the flour, salt and baking soda. In a large bowl with an electric mixer, or in your stand mixer with the paddle attachment, cream the butter, sugars and vanilla together until light and fluffy. Add each egg one at a time, beating well after each. Add the flour in three shifts, mixing fully after each addition. Fold in the chocolate chips.

Spray a cookie sheet with nonstick spray. Spread the cookie mixture evenly across the sheet, about 1/2 inch thick, leaving an even amount of space around the edges (the cookie with expand when cooked). Bake for 20-22 minutes, or until the cookie/bar is firm and cooked through, but not too brown. Remove from the oven and let cool in the pan for a few minutes. Loosen from the pan using a rubber spatula and transfer cookie bar to large cutting board (you can cut in in half to transfer it if that makes things easier).

For the icing: Beat the cream cheese, butter and vanilla together until light and fluffy. Sift the powdered sugar and add it to the bowl, beating for about 3 minutes until shiny and smooth. Spread the icing over the cookie bars, sprinkle with the cranberries and refrigerate for about an hour. Cut into squares.

Sunday, December 7, 2008

Happy Birthday Muffins


Today is December 7 - a date which will live in infamy. It also happens to be my birthday. When I woke up this morning, Rory, my newly minted husband, asked what I wanted to do to start off my day. My first inclination was to go to the Dupont Farmers Market, like I do most Sundays, and then stop by Starbucks or Teaism for a cup of something warm and a delicious morning treat. But looking out the window I determined that I was entirely too wimpy to venture out into the frigid day. If I wanted a sweet treat, I was better off making it myself. The clear choice - muffins.

I am a life long muffin lover. I'm sure I get this predilection from my father, who not only would bring home batches every weekend from Perkins, our favorite local bakery in Cincinnati, but has also been known to do his fare share of muffin experimentation. I love them all - bright lemon poppies, tart cranberry-orange, nubby oat bran. But, if we're all being honest here, I think we can agree that nothing compares to a blueberry muffin, all crumbly golden and speckled with luscious pockets of purple-blue. My absolute favorite muffins are those treated to the added decadence of a shower of crunchy, sugary streusel. And seeing as it's my birthday, I figure I get a calorie pass today.

So, here's my little birthday present to myself, a combination of versions I've tried over the years. It doesn't have to be your birthday for you to enjoy them, too - just a day in need of a little sweetness.

Blueberry Muffins with Brown Sugar Streusel
1 1/2 sticks (3/4 cup butter) unsalted butter, at room temperature
1 1/2 cups sugar
3 eggs
1 1/2 tsp pure vanilla extract
1 cup sour cream
1/3 cup milk
2 1/2 cups all purpose flour
1/2 tsp baking soda
2 tsp baking powder
1/2 tsp kosher salt
1 cup frozen blueberries
1/2 cup dried blueberries

Streusel Topping
1/4 cup rolled oats
1/4 cup brown sugar
2 tbsp butter

Note: this recipe makes 9 large or 18 regular muffins.

Preheat the oven to 350 degrees. Place paper liners in muffin tins.

In bowl of electric mixer fitted with the paddle attachment, cream the butter and sugar until light and fluffy, about 5 minutes. With the mixer on low, add the eggs, one at a time, and then add the vanilla, sour cream and milk. In a separate bowl, mix together the flour, baking soda, baking powder and salt. Add the flour mixture to the butter mixture and beat on low until just mixed. Remove the bowl from the stand and fold in the blueberries.

In a small bowl, mix together streusel ingredients with a fork or your fingers, until crumbly.

Scoop the batter into prepared muffins pans, filling each cup just to the top. Sprinkle streusel mixture evenly over muffins. Bake for 30 minutes for large muffins, 18 minutes for small muffins, or until lightly browned on top and a toothpick inserted comes out clean.

Wednesday, November 12, 2008

Quick Dish: Marie's Salad

Marie is my lovely mother and this is her, and my, favorite salad. Whenever I go home, it's pretty much a given that I'll find feta in the fridge and dried cranberries in the cupboard, ready for that night's dinner. We alway sprinkle in some toasted pine nuts for crunch, but pecans are another great option; dried cherries are a delicious stand-in, as well. And here's our little secret - soak the dried fruit in some good red wine for about 15 minutes before tossing everything together. It plumps them up and lends a wonderfully deep flavor to the salad...and drinking the cranberry-sweetened wine isn't half bad, either.

Marie's Salad
1 head romaine lettuce
1/2 cup crumbled feta
1/2 cup dried cranberries
1/2 cup good red wine
1/2 cup pine nuts

Vinaigrette
3 tbsp. balsamic vinegar
1 tbsp. honey mustard
Salt and pepper
5 tbsp. olive oil

Soak the cranberries in the wine for about 15 minutes. Drain and set aside. Drink the wine when no one's looking.

Chop the romaine roughly and arrange in a big salad bowl. Sprinkle the feta, cranberries and pine nuts. Set aside.

To make the vinaigrette, whisk together the vinegar and mustard in a small bowl. Add salt and pepper to taste. While whisking, add the olive oil in a slow and steady stream until emulsified.

When ready to serve, give the vinaigrette another quick whisk to combine and drizzle over the salad.

Sunday, September 14, 2008

Love Dish: Fig Galette with Blue Cheese, Caramelized Onions and Pancetta

I'm the first to admit, baking has always been a bit of a challenge for me. It's all that pesky measuring and exactness that I have a hard time with. However, within that intimidating realm of breads and cakes and pastries (oh my), the humble galette is one of the easiest, and luckily for me, also one of the best recipes you'll find. Small wonder it's one of my go-to dishes.

A galette is a flat, open-faced, free-form pastry. I first discovered this deceptively simple confection as I timidly paged through Baking with Julia, an excellent book on the subject that my father-the-baker bequeathed to me (a book which, I should mention, has done much to dispel my baking apprehension). I was immediately encouraged by the dough's simplicity and versatility - only a few ingredients are needed, and it works equally well for sweet or savory fillings. And, as Julia says, "The cornmeal in this wonderfully buttery dough not only gives it a bit of crunch, it makes it crisp enough to stand up to soft and syrupy fillings and sturdy enough to be rolled to extreme thinness." Translation: it's hard to screw up.

I started out by making both the tomato/cheese and the berry galette recipes in the book, and have since branched out to whatever I have on hand, particularly when there's a surplus of fruit sitting on my counter. (Speaking of which, The Houndstooth Gourmet has a great peach and raspberry galette recipe you should check out). My most recent version actually mixes sweet and savory, showcasing beautiful figs I found at the market with a sprinkling of blue cheese and a bed of sweet caramelized onions and smoky pancetta (see photos).

So as you can see, the possibilities are pretty darn endless. Try it out for yourself, and let me know what delicious combinations you come up with.

Galette Dough (from Baking with Julia):

Makes enough for 2 8-inch galettes

3 tbsp sour cream (or yogurt or buttermilk)
1/3 cup (approximately) ice water
1 cup all-purpose flour
1/4 cup yellow cornmeal
1 tsp sugar
1/2 tsp salt
7 tbsp cold unsalted butter, cut into 6 to 8 pieces

To make the dough by hand, stir the sour cream and 1/3 cup ice water together in a small bowl and set aside. Put the flour, cornmeal, sugar and salt in a large bowl and stir with a fork to mix. Drop the butter pieces into the bowl, tossing them once or twice just to coat them with flour. With a pastry blender, work the butter into the flour, aiming for pieces of butter that range in size from bread crumbs to small peas. The smaller pieces with make the dough tender, the larger ones with make it flaky.

Sprinkle the cold sour cream mixtuer over the dough, 1 tablespoon at a time, tossing with a fork to evenly distribute it. (Note: I've never needed to add more than half the liquid before the dough comes together). The dough should be moist enough to stick together when pressed; if it's not add additional cold water, 1 teaspoon at a time. With your hands, gather the curds of dough together. You'll have a soft, malleable dough, the kind you might want to overwork.

Chill the dough: Turn the dough out of the bowl and divide it in half. Press each piece of dough into a disk, wrap in plastic, and refrigerate for at least 2 hours.

To make the galette:
Position a rack in the lower third of the oven and preheat to 400 degrees. Line a baking sheet with parchment paper.

Put the dough on a lightly floured work surface and roll it into an 11-inch circle that's about 1/8 inch thick. Since the dough is soft, you'll need to lift it now and then and toss some more flour under it and over the top. Roll up the dough around your rolling pin and transfer it to the prepared baking sheet.

Spread your desired filling over the dough, leaving a 2- to 3-inch border. Fold the uncovered border of dough up over the filling, allowing the dough to pleat as you lift it up and work your way around the galette. Dip a pastry brush in water and give the edge of the crust a light coating. You can sprinkle the dough with salt or sugar, depending on the filling.

Bake the galette for 35 to 40 minutes, or until the pastry is golden and crisp. Transfer the baking sheet to a cooling rack and let the galette rest on the sheet for 10 minutes. Slip a wide spatula under the galette and slide it onto the cooling rack. Serve warm or at room temperature, cutting the tart with a pizza wheel or a sharp knife.

(The galette is best if eaten the day it's made).

Thursday, September 11, 2008

Love Dish: Bacon-Wrapped Date 'Cannolis' with Pine Nuts

As I believe I have confessed before in this forum, I love stuffing things. So awhile back when I came across a recipe for Medjool dates stuffed with ricotta, I knew I'd love them. And then when I came across a recipe for dates stuffed with ricotta and wrapped in bacon, I knew I'd REALLY love them.

After I made them the first time, I was struck by how they looked a bit like mini cannolis, the Italian pastry which is also often filled with ricotta. Cannolis often come with pistachios or chocolate shavings - or pine nuts - pressed into the end for a flourish, so, what with my love of pine nuts in general, not to mention how well they would pair with the sweet/salty/smoky balance of the dates, I figured I'd try putting it all together. And not to brag or anything, but they're pretty freakin' awesome. (This also happens to be my entry into Endless Simmer's Pine Nut Recipe contest). I hope you like them, too!

Bacon-Wrapped Date 'Cannolis' with Pine Nuts
20 Medjool dates
10 strips of applewood smoked bacon
1/2 cup ricotta
1/4 cup dry roasted pine nuts
Preheat the oven to 450 degrees. Cut off the ends of each date and remove the pit (I do this by poking a chopstick through one end). Fill the corner of a sturdy plastic baggie with the ricotta, twist until taut, and snip off just the very end to make yourself a piping bag. Fill the cavity of each date with the cheese. Cut each of your bacon slices in half so you have 20 strips. Wrap a strip snugly around each date, securing with a toothpick.

Cover a cookie sheet with wax paper and spray with non-stick cooking oil. Arrange the dates on the cookie sheet so that one of the cut sides is facing up. Pipe a bit of the remaining ricotta onto the end of each date (the bacon will serve as a 'lip' so that the cheese will stay in place - see pic).


Press a few pine nuts into each end, and carefully place in the oven. Bake for 12-15 minutes, until the bacon is cooked through and is getting crispy. Serve warm.

Wednesday, August 27, 2008

Quick Dish: Dried Figs Stuffed with Ricotta, Pine Nuts and Bacon

In case you didn’t know, I’m a big fan of stuffing things – pasta, roulades, jelly rolls, turkeys...my face...you name it, I’ll fill it. So in the spirit of stuffing, here’s a quick appetizer that’s great for a party – or just for stuffing yourself.


Ingredients:
24 dried figs
4 ounces ricotta cheese
4 slices cooked bacon, cut into small pieces*
Handful of toaste pine nuts
Honey for drizzling
Several basil leaves, chopped fine

Preheat the oven to 425 degrees. Cut off the tops of the figs and use a chopstick or similar tool to hollow out a bit of the center. If necessary, squish the figs gently to make them stand upright for baking.


Fill the corner of a sturdy plastic baggie with the ricotta cheese, tie to close, and snip off just the very tip to create a makeshift piping bag. Fill the cavity you made in the figs with the ricotta, then stuff a piece of bacon and a few pine nuts into the cheese.

Bake for 15 minutes. Remove, drizzle with honey and sprinkle with basil. Serve warm.

*Try cooking the bacon in the oven: 425 degrees for 10-15 minutes, on a rack over a cookie sheet covered in aluminum foil. It’s much easier - and less splattery – than on the stove.

Wednesday, August 20, 2008

Summer's Perfect Fruit: White Peaches

Check out this excellent article on Saveur.com about the awesomeness that is white peaches. Here’s an excerpt:

“White peaches are low in acidity. Bite into one and you'll taste no tartness—only an aromatic, floral sweetness. A ripe white peach has an undertone of raspberries, and if it matures for a few days, the flavors deepen and it starts to taste a little like muscat grapes. Eating good white peaches is the real thing—a rare experience.”

If you haven’t already, you’ve got to get yourself some of these summer beauties before they’re gone. (Toigo Orchards’ white peaches, which I've picked up at the Dupont Farmers’ Market, have been especially luscious).

Monday, August 18, 2008

Love Dish: Goat Cheesecake with Balsamic-Basil Blackberries

Goat cheese? Balsamic vinegar? Basil? That’s right, dear reader. The ingredients may be a little unusual, but this is a wow ’em dessert, and I guarantee it’ll be your new favorite summer cheesecake recipe.

(The cheesecake recipe was adapted from a version by Tyler Florence, and the basil-blackberry topping was inspired by a crumble dessert created by Jamie Oliver. Thank you, gentlemen).

Crust:
2 cups finely crushed graham cracker crumbs
1 stick butter, melted
¾ tsp cinnamon
Pinch of salt

Filling:
1 8-ounce package cream cheese at room temperature
8 ounces fresh goat cheese at room temperature
1 cup sugar
3 eggs
1 pint (2 cups) sour cream
1 tsp vanilla extract
Zest of one lemon

Topping:
2 pints fresh blackberries
1 handful finely chopped fresh basil
2 tbsp balsamic vinegar
2 tbsp sugar
2 tsp honey

Preheat the oven to 325 degrees. Set a sauce pan filled with water over high heat to boil.

For the crust:
Lightly coat the bottom and sides of an 8-inch springform pan with nonstick cooking spray. In a mixing bowl, combine the crust ingredients with a fork. Pour into the pan and press the crumbs down into the base and about 1 inch up the sides, using the bottom of a flat glass or measuring cup. Refrigerate while preparing the filling.

For the Filling: In a large bowl, beat the cream cheese and goat cheese with an electric mixer until smooth and free of any lumps. Add the eggs, one at a time, and continue to beat slowly until combined. Gradually add the sugar and beat until creamy, for 1 to 2 minutes. Add the sour cream, lemon zest, and vanilla and mix briefly to combine. Don’t forget to scrape down the sides of the bowl often. Be careful not to overbeat the batter. Pour the filling into the crust-lined pan and smooth the top with a spatula.

Set the cheesecake pan on a large piece of aluminum foil and fold up the sides around it. Place the cake pan in a large roasting pan and pour the boiling water into the roasting pan until the water is about halfway up the sides of the cheesecake pan (the foil will keep the water from seeping into the cheesecake). Bake for 45 minutes. The cheesecake should still jiggle (it will firm up after chilling), so be careful not to overcook it. Remove cake from the water bath and let cool on the counter for 30 minutes, then chill in the refrigerator, loosely covered, for at least 4 hours.

Loosen the cheesecake from the sides of the pan by running a thin metal spatula or knife around the inside rim. Unmold and transfer to a cake plate. Pour the blackberries over the top (recipe below). Slice the cheesecake with a thin, non-serrated knife that has been dipped in hot water. Wipe dry after each cut.

For the blackberries:
In a small saucepan, add the balsamic vinegar, sugar and honey and stir to combine and dissolve the sugar. Slowly bring to a boil over medium heat; allow sauce to boil gently for 1 minute. (Be careful not to boil too long as the sauce will become a syrup). Remove from heat and let cool slightly. Pour over blackberries, add the chopped basil, and stir gently to combine.

Monday, August 11, 2008

Great Dish: Fresh Figs with Prosciutto and Gorgonzola Cheese

In my opinion, one of the (only) good things about training for a marathon is the requisite carb binges that precede a long run. It was with this excuse, er, goal in mind that I headed to Sette Osteria in Dupont on Saturday night. Sette is one our go-to restaurants for decent, reasonably priced Italian food, and while I’m actually not too crazy about their pizzas, most of their pastas are pretty darn good (particularly the gnocchi with tomatoes and mozzarella and the cavatelli with spicy sausage and broccoli rabe).

Carb-driven though I was, the appetizer on the ‘daily specials’ page caught my eye – fresh figs with prosciutto and gorgonzola-slathered bread. I couldn’t resist my first taste this season of that delicious, summery sweet fruit, and its tangy/salty pairing was the perfect complement. Who knew such a little fruit could steal the show from all that pasta?