Monday, November 24, 2008

Happy Thanksgiving!


Dish-trict is on vaca right now, kicking off the Great Midwestern Cities Thanksgiving Tour (2008 edition). I hope everyone has a relaxing and delicious holiday, and I hope to be back soon with some wonderful new Heartland- and in-law-inspired recipes to share.

Tuesday, November 18, 2008

Love Dish: Heart Break Cake


I am not the least bit ashamed to admit that I am completely in love with Nigella Lawson (at left). I mean, besides reminding scores of women that being a domestic goddess is awesome, thank you very much, it’s also pretty easy to assume that the term ‘food porn’ was coined just for her – not because she’s gorgeous (which she is), but because the dishes she blithely threw together on her myriad cooking shows always looked so absolutely, indecently delicious. Her cookbooks are no different. In my favorite, Nigella Bites, she shares a recipe for a chocolate cake with pictures so enticing you’d be hard pressed not to lick the page.

Seriously though, looks notwithstanding, this is the best chocolate cake I've ever eaten. And that's saying something.

The title of this post is what it is, because, as Nigella says, “This is the sort of cake you’d want to eat the whole of when you’ve been dumped. But even the sight of it, proud and tall and thickly iced on its stand, comforts.”

Chocolate Fudge Cake
Serves 10. Or 1 with a broken heart.

For the cake:
2 2/3 cups all purpose flour
¾ cup plus 1 tbsp granulated sugar
1/3 cup light brown sugar
¼ cup best quality cocoa powder
2 tsp baking powder
1 tsp baking soda
½ tsp salt
3 eggs
½ cup plus 2 tbsp sour cream
1 tbsp vanilla extract
¾ cup unsalted butter, melted and cooled
½ cup corn oil
1 1/3 cups chilled water

For the fudge icing:
6 ounces bittersweet chocolate, minimum 70% cocoa solids
1 cup plus 2 tbsp unsalted butter, softened
1 ¾ cups confectioners’ sugar, sifted
1 tbsp vanilla extact

Preheat oven to 350.

Butter and line the bottom of two 8-inch cake pans.

In a large bowl, mix together the flour, sugars, cocoa, baking powder, baking soda and salt. In another bowl whisk together the eggs, sour cream and vanilla until blended. Using a standing or handheld mixer, beat together the melted butter and the corn oil until just blended, then beat in the water. Add the dry ingredients all at once and mix together on slow speed. Add the egg mixture, and mix again until everything is blended and then pour into the prepared tins.

Bake the cakes for 45-50 minutes, or until a toothpick comes out clean. Cool the cakes in their pans on a wire rack for 15 minutes, and then turn the cakes out onto the rack to cool completely.

To make the icing, melt the chocolate in the microwave for 2-3 minutes on medium, or in a bowl sitting over a pan of simmering water, and let cool slightly.

In another bowl beat the butter until it’s soft and creamy, and then add the sifted confectioners’ sugar and beat again until everything’s light and fluffy. (Nigella says she knows that sifting is a pain, but you have to do it or the icing will be unsoothingly lumpy). Then gently add the vanilla and chocolate and mix together until everything is glossy and smooth.

Sandwich the middles of the cake with about a quarter of the icing, and then ice the top and sides, too, spreading and smoothing with a rubber spatula.

Thursday, November 13, 2008

Quick Dish: Fall Hash


If you have some leftover salmon that needs eating, here's a Fall-tastic, 5-ingredient quick dish for you (well, technically it has 8 ingredients, but I figure the s+p and the olive oil are a given). It's oh-so-easy and works great for dinner or brunch. The salmon makes the hash plenty filling on its own, so I suppose the poached egg isn't really necessary, but who wants their hash without that lovely yellow trickle of goo? Not this girl.

Salmon and Sweet Potato Hash
1 bunch of Brussels sprouts, ends and loose outer leaves removed, halved
1 large sweet potato, peeled and cubed
1 medium sweet onion, diced
2 fillets (or about 8 ounces) leftover salmon
2 eggs
Salt and pepper
Olive oil

Preheat the oven to 400.

Toss sprouts in a little olive oil and s+p, arrange in a single layer on a foil-lined baking sheet, and roast for 20 minutes, stirring occasionally to caramelize evenly.

While the Brussels sprouts are roasting, heat a tablespoon of olive oil in a large nonstick saute pan over medium high heat and add the sweet potato cubes. Saute for about 10 minutes, until tender but still firm and beginning to brown. Add the onions and saute until soft, about 5 minutes, adding a little more olive oil if the pan gets too dry. Add the Brussels sprouts and the salmon and cook until the fish is warmed through. Add salt and pepper to taste.

Keep the hash warm while you heat a pan of water for poaching the eggs. (Adding a few drops of vinegar will help the eggs hold together). When the water is simmering, gently slide in the eggs and poach for two minutes, longer if you prefer less runny yolks. Remove with a slotted spoon and dry on paper towels. Divide the hash between two plates and top each with a poached egg.

Wednesday, November 12, 2008

Quick Dish: Marie's Salad

Marie is my lovely mother and this is her, and my, favorite salad. Whenever I go home, it's pretty much a given that I'll find feta in the fridge and dried cranberries in the cupboard, ready for that night's dinner. We alway sprinkle in some toasted pine nuts for crunch, but pecans are another great option; dried cherries are a delicious stand-in, as well. And here's our little secret - soak the dried fruit in some good red wine for about 15 minutes before tossing everything together. It plumps them up and lends a wonderfully deep flavor to the salad...and drinking the cranberry-sweetened wine isn't half bad, either.

Marie's Salad
1 head romaine lettuce
1/2 cup crumbled feta
1/2 cup dried cranberries
1/2 cup good red wine
1/2 cup pine nuts

Vinaigrette
3 tbsp. balsamic vinegar
1 tbsp. honey mustard
Salt and pepper
5 tbsp. olive oil

Soak the cranberries in the wine for about 15 minutes. Drain and set aside. Drink the wine when no one's looking.

Chop the romaine roughly and arrange in a big salad bowl. Sprinkle the feta, cranberries and pine nuts. Set aside.

To make the vinaigrette, whisk together the vinegar and mustard in a small bowl. Add salt and pepper to taste. While whisking, add the olive oil in a slow and steady stream until emulsified.

When ready to serve, give the vinaigrette another quick whisk to combine and drizzle over the salad.

Tuesday, November 11, 2008

Quick Dish: Chicken-Tomatillo Enchiladas

Got a craving for Mexican? One jar o' salsa to the rescue! This tastes as good as most of the enchiladas you can get around town, and you don't have to change out of your pajamas to enjoy them.

Chicken-Tomatillo Enchiladas

1 lb. chicken tenders, chopped into small pieces
1/2 onion, chopped
1 16-oz. can tomatillo salsa
Dash of cumin
Dash of cayenne pepper
Salt and pepper
1 tbsp olive oil
6 whole wheat flour tortillas
Shredded Monterey Jack cheese
1 ripe avocado, optional

Preheat the oven to 350.

In a small bowl, mix together the chicken, 1/2 cup of the salsa, cumin, cayenne pepper and salt and pepper to taste. Let marinate for 15 minutes.

Scoop the pulp out of the avocado into a small bowl. Add salt, pepper and a little garlic powder and mash with a fork. Set aside.

In a nonstick saute pan over high heat, add the olive oil. When the oil is shimmering, pour in the chicken mixture and saute, stirring often, until the chicken is cooked through, about 5 minutes. Set aside.

In a shallow baking dish, pour about 1/2 cup of salsa on the bottom and spread to coat. Add a few tablespoonfuls of the chicken filling down the center of each tortilla, sprinkle with a handful of cheese, and roll tightly. Place each tortilla seam-side down in the baking dish. Pour the remaining salsa over the enchiladas, covering completely, and sprinkle with additional cheese. Bake for 10 minutes, or until the enchiladas are warmed through and the cheese is melty. Serve the enchiladas topped with some of the mashed avocado.

Monday, November 10, 2008

Love Dish: Soup's On


What with all the chopping and simmering, I admit that making a big pot of beef vegetable soup doesn't really constitute a quick dish. However, if like me, you spend the majority of your Sunday evenings cooking a big meal to last through the week, come Monday and Tuesday you'll be able to enjoy this hearty meal 5 minutes after you walk in the door.

What's better, vegetable-based soups are excellent vehicles for using up any surplus veggies you have on hand, particularly all those wonderful root varieties that are in abundance this time of year. Just take into account their respective cooking times - i.e., potatoes take awhile to cook, mushrooms don't - when tossing into the pot.

Beef Vegetable Soup
2 tbsp olive oil
1 lb. beef (look for "stew meat"), cut into 1-inch cubes
2 lbs. (about 10) small new potatoes, quartered
1 lb. (about 6) carrots, chopped large
2 sweet onions, chopped large
1 can whole peeled tomatoes
Freshly ground black pepper
1 quart beef stock
1-2 cups of water
2 bay leaves
1/2 lb. green beans, ends snipped and cut into 2 inch pieces
6 ounces button mushrooms, cleaned and halved
Salt and pepper to taste

In a large stock pot, heat the olive oil until smoking. Add the beef and brown on all sides, about 4 minutes. Add the potatoes, carrots, and onions; sprinkle with black pepper and stir to combine. Add the peeled tomatoes, squeezing between your fingers to break them up. Add the beef stock, bay leaves, and 1-2 cups of water if necessary so that you have a good amount of broth. Cover and let simmer, stirring occasionally. After about an hour and fifteen minutes, add the green beans. Ten minutes later, add the mushrooms. Let simmer another 10 minutes, until the mushrooms are cooked through but still firm. Adjust seasoning with salt and pepper if needed. Serve with crusty bread for dunking.

Sunday, November 9, 2008

Quick (Comfort Food) Dish: Pastina

When I have a cold, or a crappy day at work, or pretty much any kind of bad experience that justifies some serious comfort food consumption, most often I find myself looking to my Italian roots for inspiration. And while most creations in the comfort genre require a considerable amount of time to prepare - think pot roasts, homemade spaghetti and meatballs, chocolate cake - my favorite is also one of the quickest, and classic Italian comfort food at its very best.

My grandma calls this dish pastina - literally little pasta. (Technically, that's the name of the tiny pasta used, not the milk/pasta/butter mixture she created, but hey, who's going to question Grandma?) She made it for my mom whenever she was sick, and Mom always used it as an antidote for pitiful children, whether they were the result of illness, lost soccer games or mean boys. So when I sit down with a warm bowl of pastina, I don't know which I owe it to more - the soothing starch or my childhood memories of these two wonderful women - but either way, I can't help but feel very comforted.

Note: While both ladies always used pastina/acini de pepe, these particular types of pasta can be hard to find. Orzo (pictured above) works just as well.

To make pastina: Fill a saucepan with water, salt liberally, and bring to boil. Add a cup of pastina (or orzo). Cook until al dente. Drain the water from the pan and add 2 cups of milk. Heat through, add 2 tablespoons of butter and mix to melt. Serve warm, adding more salt if desired.

Wednesday, November 5, 2008

Mmmmm, Focaccia


Now I'm not expecting you to be nearly as nerdy/masochistic as I am and spend two days making your own homemade focaccia. But hey, if you have the mixer and the patience, let your bread freak flag fly. Because the focaccia recipe below, courtesy of Baking with Julia, is some of the best bread I've ever eaten. Which, by the way, only strengthens my credo that olive oil makes everything, everything, better. Gotta love those Italians.

In addition to Katie's purist version of focaccia enjoyment above, these loaves are also excellent for sandwiches. The old man particularly loved when I sliced a big piece in half, smeared it with hummus, and topped it with chopped olives, fresh mozzarella and greens. (In fact, I believe his exact words were, "This is the best f-ing sandwich ever.")

So go forth and bake, my friends, and let me know how it turns out. And please, send along any favorite bread recipes you have, as this nerd is going to need her fix again soon.


Focaccia
2 ¼ to 2 ½ cups tepid water (about 90 degrees)
2 tbsp active dry yeast
¼ cup olive oil
6 ½ cups unbleached all-purpose flour (I love King Arthur’s brand)
4 tsp salt

Mixing the dough: Whisk ½ cup of the water and the yeast together in the bowl of a mixer. Set the mixture aside for 5 minutes, until the yeast dissolves and turns creamy.

Meanwhile, pour 1 ¾ cups warm water into a large measuring cup, add the olive oil, and whisk to blend; sets aside. Whisk the flour and the salt together in a large bowl and set this aside as well.

Pour the water-oil mixture over the yeast and stir with the whisk to blend. Add about half of the flour and stir with a rubber spatula just to mix. Attached the dough hook, add the remaining flour, and mix on low speed for about 3 minutes, or until the dough just starts to come together. If the dough appears dry or a little stiff, add a few drops of warm water, scraping the bowl and hook if necessary to incorporate the water and create a soft dough. Increase the mixer speed to medium-high and continue to mix for about 10 minutes, scraping down the hook and sides of the bowl as needed, until you have a soft, slightly moist, extremely elastic dough that cleans the sides of the bowl.

First rise: Transfer the dough to a work surface and form it into a ball. Place the dough in an oil bowl, turn it around to cover it with oil, and cover the bowl tightly with plastic wrap. Allow the dough to rise at room temperature until doubled in bulk, about 1 to 1 ½ hours.

Second rise: Fold the dough on itself to deflate it and let it rise again until doubled and billowy, 45 minutes to an hour.

Shaping and resting: Fold the dough over on itself again to deflate it (as you do this, you can hear the bubbles squeak and pop) and turn it out onto a work surface. Using a metal dough scraper or a knife, cut the dough into 3 equal pieces. Shape each piece into a ball.

The dough needs to be refrigerated for between 24 and 36 hours. (It is this long refrigerated rest that gives the focaccia its characteristic chewy texture and surface bubbles). Place each ball into an oiled gallon-size zip lock bag and refrigerate.

About 1 ½ hours before you plan to bake, remove the dough from the fridge and gently take the balls out of the bags. Place the dough on a lightly floured surface, dust the tops of the balls with flour, then cover loosely but completely with plastic wrap to keep the tops from getting crusty. Let rest for 1 hour, until the dough reaches a cool room temperature.

The Topping:
Olive oil
2-3 tbsp chopped fresh herbs, such as rosemary and/or thyme
Coarse sea salt

Position an oven rack in the lower third of the oven and preheat to 450. Line two baking sheets with parchment paper and sprinkle with cornmeal.

Shaping the dough: Use your palm to press down gently on each piece of dough, causing bubbles to appear on the sides, then slit the bubbles with a knife. Gently pull and stretch each piece of dough int a square about 10 inches across, taking care not to overwork the dough. Let the dough relax, covered, for about 10 minutes.

Baking the bread: Transfer the focaccias to the baking sheets. Brush the focaccias with oil, sprinkle with herbs and sea salt, and put them in the oven. Bake the breads for 15-20 minutes, or until they are golden with heavy speckling of small surface bubbles. (If you have a water bottle, spray the oven three times with water during the first eight minutes of baking. This creates steam which helps the focaccia bake properly. FYI – like most people, I don’t have a random spray bottle just lying around, so I skipped this step). As soon as you remove the focaccias from the oven, brush them with a little additional olive oil and transfer them to a rack to cool before serving.

Storing: The focaccias are best the day they are baked, but once cooled, they can be wrapped airtight and frozen for up to 2 weeks. Thaw the breads, still wrapped, at room temperature and warm them in a 350 oven before serving.

Tuesday, November 4, 2008

Quick Dish: Macadamia Nut Crusted Halibut

I am ridiculously tardy in posting about all the wonderful food I got to enjoy whilst honeymooning in Maui, and I promise, it’s coming. But in the meantime, since I’m too lazy to do the full write up, but too antsy what with this election going on to just sit here, I’ll tell you about the so-simple-yet-so-good dinner I made last night, thanks to a package of macadamia nuts I picked up in the duty-free store on the way home.

This is a unique little riff on the ubiquitous pecan-crusted trout, but, if I do say so myself, I think even better. In Hawaii, of course, mahi mahi was the chosen fish, but any flaky white version will do. Just don’t feed the leftovers to your dog. Apparently macadamia nuts are poison to their little systems. Who knew.

Macadamia Nut Crusted Halibut
2 6-ounce filets halibut or other flaky white fish
3/4 cup dry roasted salted macadamia nuts
¼ cup grated parmesan cheese
Freshly ground black pepper
1 egg
1 tbsp olive oil

Preheat the oven to 350.

Pat the fish filets with a paper towel. Crack the egg into a wide, shallow bowl and beat lightly. Set aside.

Place the macadamia nuts into a zip lock baggie, seal, and pound lightly to crush. Pour the nut pieces into another wide shallow bowl, add the cheese and freshly ground pepper to taste, and stir to combine.

Dip one side of the filets into the egg and then press into the nut/cheese mixture, patting down gently to adhere the coating.

Place a large nonstick sauté pan over high heat and add olive oil. When the oil shimmers, add the fish, nut side down, and sauté for about 2 minutes, until the crust is golden brown. Flip the fish over and transfer the pan into the oven. Cook until the fish is flaky white, but not overdone, about 6-8 minutes.

Serve with a leafy green salad, preferably with balsamic vinaigrette.

A Bread Odyssey

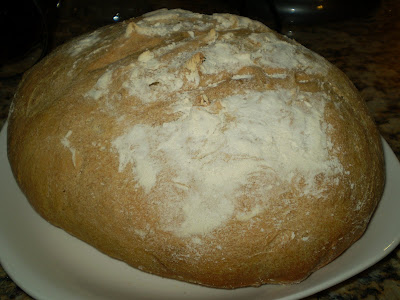
Behold, I have made….bread.

Ok, so it wasn’t very good bread – kinda tough, not very tasty, and with a conspicuous lack of those lovely little air bubbles all the stupid baking books keep telling me about. But still, it was homemade bread. That I made. With yeast and flour and hours and hours of impatience while it rose in a ‘cool dark place.’ Hey, it’s no artisan sourdough ciabatta loaf, but it’s a start.

So, despite my mediocre first attempt at the domestic goddessness that is bread baking, I’m not giving up. Because there really is something incredibly gratifying about creating that delicious bread baking smell in a city apartment approximately the size of a loaf pan. (And more importantly, because my brand new KitchenAid mixer is taking up over half my counter space and I have to justify its presence somehow). So bear with me, dear readers, as I continue on my bread odyssey. If nothing else, I should have pretty pictures to share.

Oh, and don't forget to vote.

Monday, November 3, 2008

Slurp Soup for a Good Cause

When chilly weather arrives and gray, icky sweater season is upon is, there's nothing better than a warm bowl of soup after a long day of slushing through the cold. Now, there are no shortage of options around town for this bastion of comfort food, so why not get your dose while also supporting a good cause? For the enitre month of November - National Diabetes Month - the menu at Oceanaire will feature a heart-healthy version of beef barley soup (pictured at right), the proceeds of which will be donated to the Capitol Chapter of the Juvenile Diabetes Research Foundation (JDRF) to support research aimed at curing diabetes and its complications.

This is the eighth time that the popular downtown seafood spot has dished out a soup to benefit JDRF during National Diabetes Month. Kudos to Oceanaire and Chef Rob Klink for supporting a great mission with great food.